
Last October, a 2-millimeter thickness variance in an imported composite shipment halted a major manufacturer’s entire production line. That microscopic gap ruined the adhesive bond, creating massive voids under the fiberglass once the factory press clamped down. If you source materials strictly on lowest unit price, you will pay for it later when RV Sidewall Delamination destroys your warranty budget.
Our engineers wrote this guide because we constantly see factories trying to bond modern structural composites using outdated tape methods. Wood forgives bad measurements; high-performance sandwich panels do not. We pulled three years of factory test data to give you the exact adhesive open times and CNC routing tolerances needed to prevent hidden voids, because ignoring these specs causes the exact nightmares buyers read about in the People Also Ask section online.
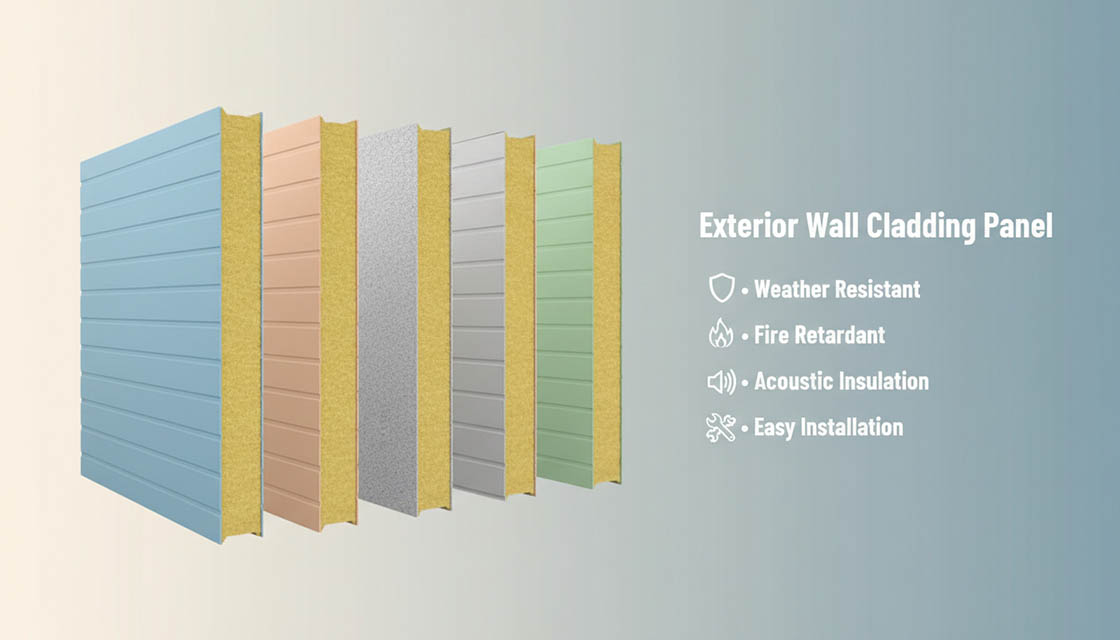
Table of Contents
RV Exterior Wall Materials
Modern composite RV panels reduce wall weight by up to 40% compared to traditional plywood and aluminum builds. For OEMs, the choice between FRP and Aluminum skins directly dictates assembly speed, adhesive selection, and long-term warranty claim rates.
FRP vs. Aluminum Composite Skins
Aluminum historically served as the standard, but it routinely cracks and suffers thermal bridging under continuous road vibration. Today, FRP (Fiberglass Reinforced Plastic) and CFRT (Continuous Fiber Reinforced Thermoplastic) skins dominate production because they absorb shear stress without failing. When you pair these skins with a core featuring a thermal conductivity of just 0.025 W/m·K, you eliminate secondary thermal breaks and avoid the catastrophic failures that leave owners asking, Does Insurance Cover RV Delamination Repai.
- FRP and CFRT skins ship in 1.5mm to 3.0mm thicknesses to resist denting without adding dead weight to the vehicle. Choosing the exact right thickness prevents the structural rot that forces consumers to search online for How to Fix Delamination in Rv. Proper skin specification equals zero warranty claims on your factory floor.
- Aluminum skins offer lower upfront material costs and decent weatherability. But they require strict engineering to manage thermal expansion and stop the glue lines from degrading. If you ignore these expansion rates, you will face a Progressive failure of the adhesive bond over time that completely eats your profit margins.
Moving your production line to FRP means throwing out your old mechanical fasteners. You cannot staple or screw these composites without destroying the structural envelope. To avoid a massive spike in your RV composite panel delamination warranty c, manufacturing teams must use MS polymer or structural polyurethane adhesives and hold a minimum clamp time of 45-60 minutes at 70°F (21°C) to achieve safe handling strength.
Structural Core Differences and Assembly Tolerances
Buyers obsess over the exterior skin, but the core dictates the structural fate of the wall. Inconsistent foam thickness causes uneven pressure during the curing process. This creates hidden voids that trigger RV Sidewall Delamination down the road. When retail customers spot these bubbles, they immediately check Google’s ‘People Also Ask’ features or search queries like ‘RV composite panel delamination warranty c’ to see if they can force a claim.
- XPS and PET foam cores set the standard for thermal retention in exterior walls. Skinned with our composites, these panels hit ASTM E84 Class 1 / Class A fire ratings. This rating is a strict requirement for commercial vehicle safety compliance. You simply cannot skip this spec.
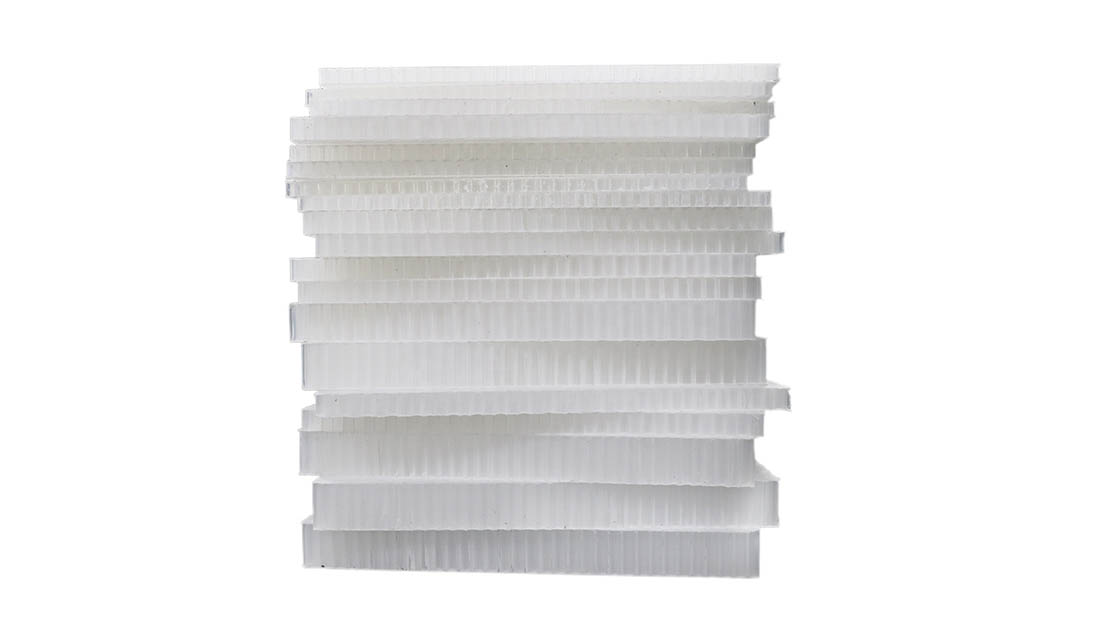
- Honeycomb cores belong in interior partitions or specialized weight-saving builds. You use them when shedding pounds matters more than maximum insulation. They keep the overall vehicle mass within legal transport limits. Weight reduction is their primary job.
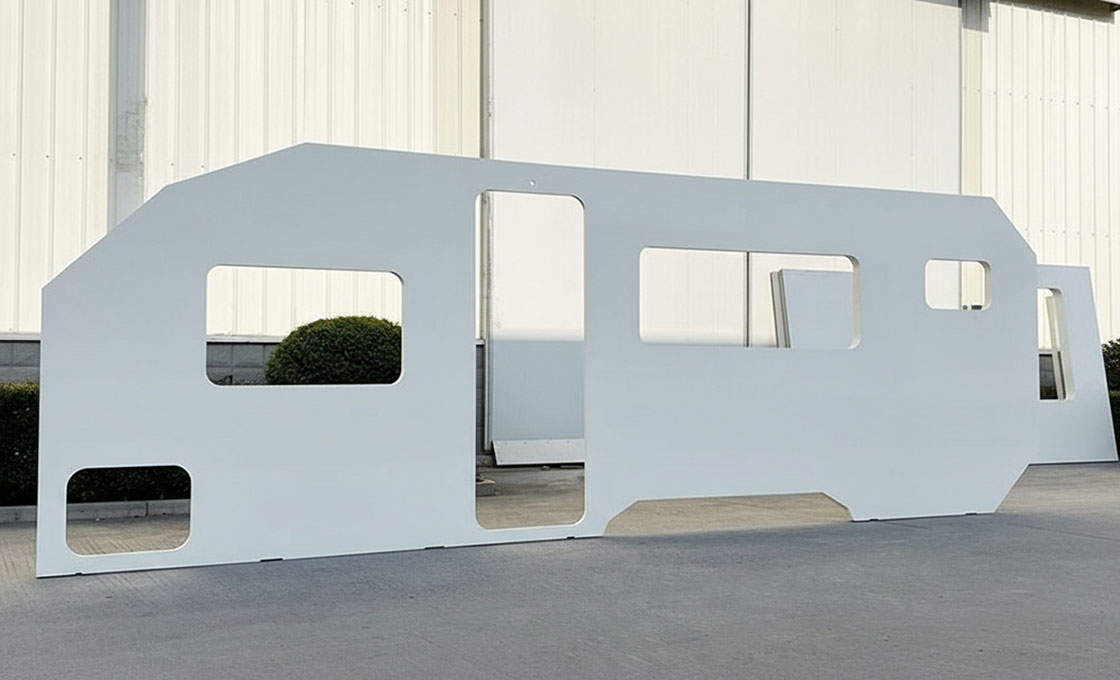
To prevent assembly line shutdowns, CNC-cut panels require strict ±0.5mm tolerances. This precision stops adhesive voids during frame mounting. We machine custom tongue-and-groove profiles instead of relying on outdated tape. This design provides superior shear strength and completely eliminates thermal bridging.
| Material Feature | Technical Specification | OEM Benefit | Production Note |
|---|---|---|---|
| Panel Composition | CFRT/FRP Skins with XPS/PET Foam Cores | Up to 40% weight reduction vs traditional wood/aluminum | Eliminates the need for secondary thermal breaks |
| Skin Thickness | 1.5mm – 3.0mm options | High strength-to-weight ratio and impact resistance | Prevents vibration fatigue and structural failure |
| Thermal Insulation | 0.025 W/m·K thermal conductivity | Superior temperature retention for extreme climates | Meets strict RV energy efficiency and compliance standards |
| Fire Safety Rating | ASTM E84 Class 1 / Class A | Ensures passenger safety and regulatory compliance | Critical for commercial RVs and overlanding vehicles |
| CNC Manufacturing Tolerances | Cut to exact CAD models within ±0.5mm | Prevents uneven pressure and hidden delamination voids | Supplied with tongue-and-groove profiles to eliminate thermal bridging |
| Structural Adhesive Bonding | MS polymer or structural polyurethane | Maximizes shear strength and assembly line speed | Requires 45-60 minutes minimum clamp time at 70°F (21°C) |

Required Tools and Fasteners
Forget staples and basic caulking. In modern OEM RV sandwich panel assembly, structural adhesive bonding combined with precise CNC profiles is the only way to prevent vibration fatigue and thermal bridging.
Adhesives vs. Mechanical Fasteners
Switching from wood framing to composites changes how you attach materials. Mechanical fasteners like screws and staples create severe stress points under constant road vibration. They puncture the protective skins, letting moisture rot the foam core. When that happens, retail buyers start Googling ‘How to Fix Delamination in Rv’ or checking if a Progressive policy means ‘Does Insurance Cover RV Delamination Repai’ instead of enjoying their vacation.
Use high-strength structural adhesives—specifically MS polymers or structural polyurethanes—for OEM bonding. These chemicals distribute shear loads evenly across the entire surface area. They prevent the localized stress that causes material failure. Our panels utilize tongue-and-groove CNC profiles to ensure alignment, strictly kept within ±0.5mm tolerances to eliminate adhesive joint voids.
Clamping and Curing Equipment
A 1mm variance in panel thickness will crush your foam core during the clamping process, creating hidden voids that directly cause RV Sidewall Delamination. We test our composite sheets to hold strict tolerances. This completely removes the guesswork from your assembly line.
Structural adhesives demand exact shop floor temperatures to hit handling strength. If your line runs cold, the bond fails before the unit ever leaves the factory. We supply our OEM partners with exact curing parameters to prevent an RV composite panel delamination warranty c.
- Clamp time: Hold for 45-60 minutes at 70°F (21°C) to reach handling strength. Rushing this step costs more in rework than it saves in production speed.
- Pressure: Apply uniform distribution across the joint. If you apply too much point pressure, you crush the XPS or PET foam core instantly and destroy the panel’s structural integrity.
- Open time: Tool and mate the adhesive within the exact window. If the glue skins over, figuring out How to Fix Delamination in Rv units later will become your service department’s biggest headache.
- Solvent Wipe: Degrease the aluminum frame right before applying the adhesive. Use isopropyl alcohol or a similar low-residue solvent. This completely strips the rolling and forming oils that ruin structural bonds.
- Mechanical Abrasion: Scuff the bonding zone with a Scotch-Brite pad or fine-grit abrasive. You must create a physical profile so the glue has something to grip.
- Final Clean: Wipe the surface a second time using a fresh, lint-free cloth. You cannot leave any abraded dust behind.
- You must use an industrial MS polymer or a heavy-duty structural polyurethane as your adhesive base. Skip the budget adhesives. If you use sub-par glue, you will inevitably trigger claims under your RV composite panel delamination warranty c, which eats your profit margins alive.
- Hold your clamp time to a strict 45 to 60 minutes minimum at 70°F (21°C) to hit proper handling strength. Rushing this step causes massive field failures. It leaves your dealers searching “How to Fix Delamination in Rv” instead of focusing on selling units.
- For joint preparation, strictly avoid any secondary trimming that breaks the factory seal. Once you cut through that protective edge, moisture attacks the substrate and destroys the bond. This leads to catastrophic structural damage that leaves end-users asking, Does Insurance Cover RV Delamination Repai?
Surface Prep and Tolerances
Frame Cleaning Protocol
Surface prep dictates whether a bond lasts 10 years or 10 months, so never attach composite panels to an aluminum frame covered in mill scale or oil. Treat your frame bonding surfaces as critical structural joints instead of relying on outdated tape and seal methods. When retail buyers check the People Also Ask boxes wondering Does Insurance Cover RV Delamination Repai, they quickly find out that insurers like Progressive routinely deny claims caused by poor factory prep.
Skip the guesswork if you want MS polymer or structural polyurethane adhesives to actually hold. Our engineers mandate this exact preparation sequence:
Accounting for Panel Thickness
Inconsistent panel thickness causes uneven pressure distribution during adhesive curing, leading directly to hidden delamination voids and production line bottlenecks.
Shifting from wood to modern sandwich panels means tightening your assembly tolerances. We hold OEM production tolerances for CNC-cut panels strictly to ±0.5mm. If panel thickness varies across the run, clamp pressure squeezes the structural adhesive out unevenly. This creates immediate weak points, driving up your RV composite panel delamination warranty c costs and causing severe RV Sidewall Delamination failures in the field.
We stop this by supplying custom CNC-routed panels mapped directly to your CAD models. We use precise tongue-and-groove profiles to eliminate thermal bridging. Because industrial structural adhesives require 45-60 minutes of clamp time at 70°F (21°C) to hit handling strength, any thickness variance will stall your assembly line. When factories use out-of-spec parts, their customers eventually search the People Also Ask boxes for How to Fix Delamination in Rv, or check if Does Insurance Cover RV Delamination Repai through providers like Progressive. Sourcing our precision-cut CFRT and FRP panels ensures a uniform adhesive spread and eliminates secondary trimming on the factory floor.
5-Step Industrial Installation Guide
Transitioning your RV production line to composite sandwich panels demands strict adherence to OEM assembly tolerances, replacing outdated mechanical fasteners with engineered structural adhesives to prevent vibration fatigue and delamination.
1. Dry Fitting CNC-Cut Panels
Dry-fit your CFRT and FRP sandwich panels against the vehicle CAD models before you even think about opening a glue bucket. Our CNC routing holds OEM production tolerances to a strict ±0.5mm. That precision is the only way to prevent adhesive voids during the bonding process. Force the tongue-and-groove joints, and you ruin the seal.
2. Adhesive Application Methods
Throw out the staples, screws, and basic caulking. High-grade MS polymer or structural polyurethane adhesives are mandatory for bonding composite panels to metal frames. Apply a continuous V-bead across the structural framing to prevent thermal bridging and stress fractures. Respect the manufacturer’s open time, or the extreme shear loads on overlanding rigs will destroy the bond.
3. Mounting and Pressure Application
When setting the skin, apply steady pressure using vacuum bags, heavy presses, or mechanical clamps. Uneven thickness causes pressure spikes that trigger RV Sidewall Delamination long before the unit leaves the factory floor. Our strict tolerancing prevents this, but you still must hold the clamp for a full 60 minutes at 70°F to reach handling strength. Rush the cure time, and the panel shifts.
4. Edge Sealing and Trim
Seal those exposed foam or honeycomb cores the second the panel hits handling strength. Old-school tape-and-seal methods guarantee long-term water intrusion on modern rigs. You need custom PVC edge trim or heavy elastomeric sealant compressed tight against the CFRT or FRP skins. This mechanical barrier stops moisture wicking dead in its tracks.
5. Curing and Quality Control Checks
Wait a full 24 hours for the chemical cure before moving the wall to the next production station. Your QC team must run destructive peel tests on batch samples and tap-test the entire surface for hollow echoes. Catching hidden voids at this stage is the only way to avoid catastrophic RV composite panel delamination warranty claims later. A bad batch ruins your margin.
| Step | Action | Specification | Required Materials | OEM Benefit |
|---|---|---|---|---|
| Step 1: Inspection & Preparation | Verify custom CNC-cut panel dimensions against vehicle CAD models and prep surfaces. | Tolerances strictly within ±0.5mm to prevent adhesive joint voids. | Calipers, CAD models, isopropyl alcohol. | Eliminates secondary trimming, preventing production line shutdowns. |
| Step 2: Dry Fit & Frame Alignment | Align tongue-and-groove profiles to the aluminum RV frame to ensure exact flush mounting. | Consistent thickness across FRP or CFRT skins to guarantee even pressure distribution. | Alignment jigs, securing fixtures. | Eliminates thermal bridging and outdated tape-and-seal structural failures. |
| Step 3: Structural Adhesive Application | Apply adhesive to bonding surfaces using a controlled, continuous bead technique. | Must use MS polymer or structural polyurethane adhesives with specific open times. | MS polymer adhesive, structural polyurethane, dispensing equipment. | Resists vibration fatigue and prevents delamination on the road. |
| Step 4: Clamping & Curing | Apply even pressure across the rv sandwich panel and maintain proper clamp time. | Minimum clamp time of 45-60 minutes at 70°F (21°C) to reach handling strength. | Factory clamps, temperature-controlled curing environment. | Ensures superior shear strength and prevents hidden delamination voids. |
| Step 5: Final Quality Assurance | Inspect adhesive joints and verify structural and thermal performance metrics. | Fire rating ASTM E84 Class 1/A; Thermal conductivity 0.025 W/m·K core. | QA checklists, thermal imaging tools. | Guarantees compliance, lowers warranty claim rates, and meets weight targets. |
Avoiding Costly Assembly Mistakes
While composite rv wall panel systems reduce wall weight by up to 40% compared to traditional builds, realizing those savings requires abandoning DIY assembly tactics in favor of precision CNC profiles and structural adhesives.
Stop Using Mechanical Fasteners and DIY Caulk
Engineers shifting from wood often try to screw or staple into fiberglass assemblies, which instantly destroys the structural integrity of the FRP skins. If you check the People Also Ask boxes online, you will see panicked owners searching for How to Fix Delamination in Rv or wondering Does Insurance Cover RV Delamination Repairs through providers like Progressive. Relying on mechanical fasteners in commercial OEM manufacturing causes exactly these expensive field failures.
Getting a solid bond on an OEM RV composite panel means relying 100% on chemical adhesion. When you mate these skins to an aluminum frame, that chemical connection dictates everything. We constantly see questions in the “People Also Ask” sections of trade forums about structural adhesive failures, so we enforce strict application specs for RV wall glue.
The Hidden Cost of Inconsistent Thickness
Hidden delamination from uneven clamping pressure bleeds money on the assembly line. If you buy cheap panels with wild thickness variations, your press applies unequal force across the sandwich tolerances. This creates internal voids where the adhesive completely misses the core, triggering immediate RV Sidewall Delamination once the rig hits highway speeds and faces Progressive wind shear forces.
We stop this production bottleneck dead in its tracks by mapping our custom CNC routing directly to your vehicle CAD models. We lock standard OEM production tolerances strictly within ±0.5mm. That exact precision prevents adhesive voids and keeps your assembly line moving fast without costly rework.
Upgrading from Outdated Tape and Seal Methods
The old “tape and seal” joining method fails fast under constant curb strikes and off-road vibration. Rigid tape joints snap immediately under dynamic shear loads when a vehicle hits rough terrain. This constant micro-stress is the number one cause of catastrophic RV Sidewall Delamination failures.
We use CNC tongue-and-groove profiles bonded with heavy-duty structural adhesives to completely eradicate thermal bridging. Using FRP skins with a 0.025 W/m·K thermal conductivity core means you stop buying expensive secondary thermal break materials. This specific bonded joint design provides the shear strength required to handle extreme highway vibration.
| Assembly Mistake | Root Cause | Correct Specification | Required OEM Action | KPI Impact |
|---|---|---|---|---|
| Hidden Delamination Voids | Inconsistent panel thickness causing uneven pressure during adhesive curing | Strict CNC routing tolerances within ±0.5mm | Source precision-cut CFRT/FRP panels to eliminate secondary line trimming | Prevents on-road structural failures and drastically reduces warranty claim rates |
| Adhesive Joint Failure | Using DIY consumer repair methods like stapling, caulking, or outdated tape-and-seal | MS polymer or structural polyurethane adhesives with specific open times | Upgrade to tongue-and-groove CNC profiles bonded with structural adhesives | Increases assembly speed while maximizing shear strength and vibration fatigue resistance |
| Production Line Shutdowns | Rushing the bonding process and moving panels before adhesive sets | Minimum clamp time of 45-60 minutes at 70°F (21°C) for handling strength | Adjust production line pacing to accommodate structural adhesive cure times | Eliminates production bottlenecks and costly rework due to ill-fitting panels |
| Thermal Bridging and Leaks | Relying on secondary thermal breaks and poorly sealed mechanical fasteners | FRP skins with a 0.025 W/m·K thermal conductivity XPS/PET foam core | Transition to fully bonded composite wall systems instead of traditional wood/aluminum | Achieves ASTM E84 Class 1 fire ratings and reduces overall wall weight by up to 40% |
Conclusion
If your line outputs over 30 units a month, stop cutting plywood and spec custom CNC-routed CFRT foam core panels today. You drop wall weight by 40% and clear manual trimming completely off your factory floor. This simple shift accelerates assembly and kills the RV composite panel delamination warranty c claims eating your profit margins.
You never want customers complaining about your factory when they search online for How to Fix Delamination in Rv or ask Does Insurance Cover RV Delamination Repai. Top-tier companies like Progressive demand rigorous physical testing to avoid showing up in negative People Also Ask sections. Send us your current sidewall CAD profiles, and our engineering team will ship three structural polyurethane-bonded test pieces straight to your dock for your own 45-minute clamp evaluations.
Frequently Asked Questions
How do you attach wall panels to the wall?
In OEM manufacturing, wall panels are attached using a combination of structural adhesives (like MS polymers) and specialized mechanical fasteners, rather than standard nails or screws which can cause stress fractures in composites.
What material is used for RV exterior walls?
Modern high-end RVs utilize FRP (Fiberglass Reinforced Plastic) or CFRT (Continuous Fiber Reinforced Thermoplastic) sandwich panels with foam or honeycomb cores, chosen for their high strength-to-weight ratio and thermal insulation properties.
Do you nail or glue wall panels?
Adhesives are strictly preferred over nails in commercial RV builds. Nails create micro-fractures in composite skins and act as thermal bridges. Industrial adhesives provide a continuous bond that absorbs road vibration and maintains structural integrity.
What are common panelling mistakes?
The most critical OEM mistakes include ignoring surface preparation (dust/grease on frames), using incorrect adhesive open-times for large panels, and failing to account for thickness variances which causes misaligned joints.
How to panel walls for beginners?
For manufacturing beginners, the priority is the ‘dry fit’. Always place CNC-cut panels onto the vehicle frame without adhesive first to verify tolerances, ensure proper tooling clearance, and map out mechanical fastener placement before committing to structural bonding.