
Last month, a heavy truck manufacturer halted their assembly line for three days. The culprit? A batch of out-of-spec materials that left a 2mm gap along the roof extrusion. When the humidity spiked, that gap sweated condensation straight into the main wiring harness. Warranty claims from roof leaks will destroy your margin faster than almost anything else. Installing an insulated ceiling panel in a specialized vehicle is not the same as framing a house. You are fighting constant vibration, strict weight limits, and zero tolerance for thermal bridging on metal subframes. If your materials arrive without precise factory CNC routing, your team spends 40% longer trying to force ill-fitting raw sheets into place.
We pulled our internal lab data on composite joint failure to show exactly how to prevent these production headaches. We tested the specific structural adhesives, the 1,800 rpm fastener limits that prevent stripping, and the strict 25mm air gap requirements that stop hidden moisture buildup. You will walk away knowing the exact hybrid bonding methods required to secure composite roofs without creating micro-fractures. No theoretical fluff. Just the hard numbers you need to drop vehicle weight and hit a zero-defect rate on your line.
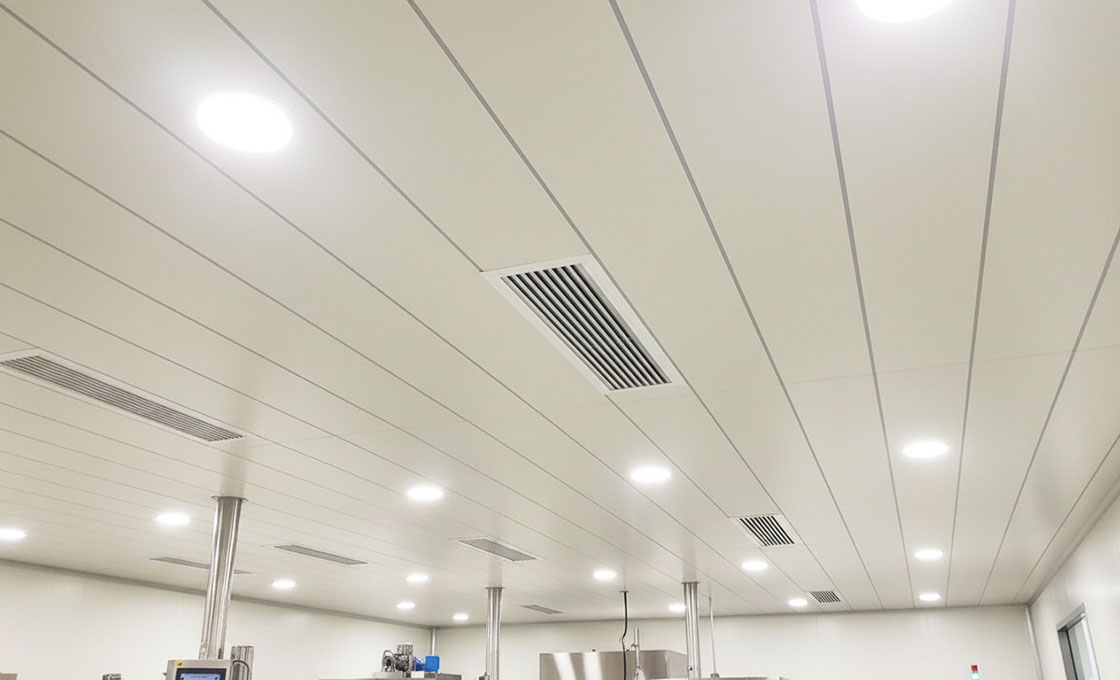
Table of Contents
Pre-Installation Panel Prep
Pre-installation preparation dictates assembly line success. Strict acclimation and subframe alignment prevent structural adhesive failures and eliminate costly warranty claims.
Acclimation and Storage Tolerances
Before applying any structural adhesive, acclimate your CFRT or GRP/FRP honeycomb panels to the assembly environment. Sudden temperature shifts compromise the chemical bond of the adhesives. Our factory-controlled CNC routing ensures your custom CNC cut composite ceiling panels are exact upon arrival, but extreme thermal swings during unmonitored storage can cause microscopic expansion that throws off final fits.
We strictly manufacture our insulated ceiling panels with a thickness tolerance of ±0.5mm. Exceeding this variance forces line workers to adjust clamping pressure on the fly, resulting in uneven adhesive lines or starved joints. Store the panels flat on rigid supports to prevent warping, ensuring they are ready for immediate deployment on the production floor.
Subframe Alignment and Strapping
Align the aluminum extrusions and structural strapping with zero deviation. When installing composite panels in vehicle roofs, you must maintain a minimum 25mm (1 inch) air gap behind the panel. This gap is non-negotiable. It prevents moisture buildup and condensation in enclosed cavities, neutralizing a primary source of interior leaks and structural rot.
Using mechanical fasteners exclusively on composite panels invites thermal bridging and micro-fractures. We mandate a hybrid approach: apply a structural adhesive with a tensile strength exceeding 2.5 MPa, and use temporary mechanical clamping to hold the panel while it cures. If your process requires self-drilling screws for the strapping, limit your tool’s driving speed to 1,800 rpm. Higher speeds strip the metal subframes and immediately compromise the joint’s vibration resistance.
Cutting and Fitting Custom Panels
Factory CNC routing cuts field installation time by up to 40% compared to raw sheet goods. In vehicle OEM assembly, pre-fabricated composite panels eliminate the bottleneck of on-site modifications.
CNC Precision vs. Field Cuts
In specialized vehicle manufacturing, relying on manual field cuts for composite panels introduces unacceptable variables. Inconsistent edges compromise joint sealing, leading to warranty claims from wind shear and water ingress. We machine our insulated ceiling panels to exact specifications to ensure seamless integration into automated assembly lines.
- Dimensional Tolerance: We strictly control thickness variances to ±0.5mm to guarantee even adhesive lines and prevent structural weak points.
- Assembly Speed: Factory CNC profiling reduces field installation time by up to 40% compared to raw sheet goods by eliminating on-site trimming.
- Equipment Needs: Pre-cut panels eliminate the need for specialized cutting equipment on the factory floor, reducing dust contamination and labor costs.
Routing Channels for Wiring and Extrusions
Integrating wiring harnesses and aluminum extrusions into a vehicle roof requires precise geometry. Machining these channels on-site risks penetrating the structural core or creating thin spots that compromise thermal performance. Pre-routed channels protect the integrity of the panel while ensuring a flush fit for extrusions, preventing micro-fractures caused by vehicle vibration.
Proper channel routing also dictates your thermal management strategy. To prevent moisture buildup and condensation in enclosed cavities, designs must maintain a minimum 25mm (1 inch) air gap requirement for ceilings. We program these spatial requirements directly into the CNC router. This guarantees that wiring channels never intrude on the critical air gap, effectively preventing thermal bridging across metal subframes.

Fastening Methods for Vehicles
Our panels rely on precise adhesive bonds with strategic mechanical support to eliminate thermal bridges and ensure vibration resistance.
Structural Adhesive Application Specs
Structural adhesive creates continuous sealing against moisture and vibration, critical for vehicle enclosures.
We require adhesive tensile strength exceeding 2.5 MPa to maintain roof integrity under dynamic loads.
Our factory-controlled CNC routing maintains ±0.5mm thickness consistency, preventing uneven adhesive lines that cause bonding failures.
- Tensile Strength: >2.5 MPa minimum
- Panel Tolerance: ±0.5mm thickness variance
- Application: Continuous bead with no gaps
Mechanical Fastener Spacing and Types
Use mechanical fasteners only as supplemental support at panel edges and critical junctions.
Drive self-drilling screws at 1,800 rpm max to prevent stripping aluminum subframes.
This hybrid approach minimizes thermal bridging while securing panels during adhesive cure cycles.
- Screw Type: Self-drilling for metal subframes
- Speed Limit: 1,800 rpm maximum
- Primary Role: Temporary clamping until adhesive cures
Sealing and Thermal Bridging
Eliminating thermal bridging in metal vehicle subframes requires a strict 25mm air gap paired with a hybrid adhesive-fastening system. We hold CFRT and FRP panel tolerances to ±0.5mm to guarantee consistent sealing lines and zero condensation cavities.
Vapor Barrier and Air Gap Rules
When transitioning from traditional wood framing to modern monocoque composite designs, trapped moisture becomes a primary driver of warranty claims. Installing an insulated ceiling panel directly against the vehicle skin guarantees condensation buildup inside the structural cavity. You must engineer a dedicated ventilation gap to equalize pressure and allow moisture to escape.
To prevent moisture accumulation and ensure the long-term efficacy of your vehicle insulation, adhere to these specific structural requirements:
- Air Gap Clearance: Maintain a minimum 25mm (1 inch) air gap between the outer vehicle skin and the insulation surface to facilitate adequate airflow.
- Thickness Consistency: Strictly control panel thickness to a ±0.5mm tolerance to avoid uneven adhesive lines that can disrupt the air gap.
- Thermal Conductivity Mapping: Calculate the specific K-value of your chosen core—whether cross-linked PVC foam, honeycomb, or CFRT—to precisely determine the vehicle HVAC loads.
Our factory CNC routing ensures these exact geometries are maintained across the entire production run. Pre-cutting the panels to ±0.5mm tolerances removes the manual guesswork that typically leads to crushed air gaps or compromised vapor barriers during field assembly.
Joint Sealing for Metal Frames
Relying exclusively on mechanical fasteners to secure sandwich panels to aluminum extrusions is a critical engineering failure. Over-compressing the core creates micro-fractures and severe thermal bridges that transfer outside temperatures directly through the fastener to the interior. We utilize a hybrid approach: high-shear structural adhesive combined with temporary mechanical clamping to yield superior vibration resistance without compromising the thermal break.
Execute your fastening and sealing protocol using the following mechanical parameters:
- Adhesive Tensile Strength: Must exceed 2.5 MPa to ensure structural integrity for vehicle roof bonds subject to constant wind shear.
- Fastener Driving Speed: Limit mechanical fastener driving to 1,800 rpm for self-drilling screws to prevent stripping the metal subframes.
- Factory Profiling: Utilize pre-routed custom CFRT sandwich panel tolerances to reduce field installation time by up to 40% compared to raw sheet goods.
Applying the optical adhesive correctly fills the microscopic voids between the metal frame and the composite panel, creating a continuous thermal break. By controlling the fastener depth and relying on the adhesive for primary shear strength, you eliminate the leak paths that frequently develop at the joints of RV and marine cabin roofs under continuous vibration.

Quality Control and Load Testing
Strict flatness tolerances and adhesive curing protocols directly eliminate assembly bottlenecks and warranty claims in vehicle production.
Checking for Flatness and Delamination
We laser-scan every panel at CNC routing to maintain ±0.5mm thickness consistency. Uneven surfaces create uneven adhesive lines, causing micro-fractures under vibration. Delamination risks come from core-adhesive bonding failure during thermal cycling.
- Thickness Verification: Digital micropoint mapping across 100mm grids ensures surface deviation stays under 0.3mm after CNC profiling.
- Delamination Test: Ultrasonic frequency analysis scans for core-adhesive separation points on honeycomb and CFRT structures.
- Shear Pressure Check: 0.2MPa vacuum bag testing during lamination verifies no air pockets exist between layers.
Monitoring Adhesive Cure Times
Our structural adhesive requires precise 72-hour cure cycles at 23°C±2°C and 50%±5% RH. Premature clamping removal below 2.5MPa tensile strength causes bond slippage under vehicle shear forces. Hybrid systems must cure before mechanical fastener removal.
- Cure Tracking: IoT-enabled humidity/temperature sensors log real-time data to activate curing ovens only when optimal conditions are met.
- Strength Validation: Digital pull testing confirms adhesive achieves structural bond strength (≥2.5MPa) before clamps are released.
- Fastener Protocol: Mechanical screws limited to 1,800rpm torque to prevent subframe stripping during temporary holding phases.
Conclusion
Look, the data is clear: relying on manual field cuts for your ceiling panels guarantees inconsistent adhesive lines and future warranty claims. If your goal is zero defects on the line, you must specify factory CNC profiling with that strict ±0.5mm tolerance. It eliminates the fitting bottleneck and cuts your installation time by 40%.
Stop guessing if our materials match your line speed. Request a custom CNC-routed sample kit based on your specific roof geometry. Have your technicians run a timed trial with our recommended high-shear adhesive to verify the labor savings yourself.
Frequently Asked Questions
How to install ceiling insulation panels?
In specialized vehicle manufacturing, installation involves applying a continuous structural adhesive bead to the subframe, positioning the CNC-cut panel, securing it with temporary mechanical fasteners until the adhesive cures, and sealing all joints with a marine-grade elastomeric sealant.
Can I install insulated panels myself?
While DIY installation is possible for small projects, vehicle OEM production lines require trained technicians. Proper installation demands precise handling of lightweight composite panels, accurate adhesive mixing ratios, and specific clamping pressures to prevent delamination.
Which side of insulation foam faces out?
For vehicle and marine applications, the reflective foil or vapor-impermeable barrier must face the interior (the warm side) of the cabin to prevent humid internal air from condensing inside the wall cavity. The exterior-facing side should allow for a 25mm ventilation gap.
Do I need to leave an air gap for insulation?
Yes, it is recommended to leave an air gap of at least 25mm (1 inch) between the insulation and the outer vehicle skin or roof surface. This allows for necessary ventilation and prevents moisture buildup that can lead to mold or structural corrosion.
How to attach insulation panels to a metal frame?
Avoid standard screws which crush lightweight cores. Use a combination of high-strength polyurethane (PU) structural adhesive to bond the panel to the aluminum or steel subframe, supplemented by broad-head fasteners only at specified load-bearing points to hold the panel while the adhesive sets.